
AceMoney Receipts
Review trips, vehicles and mileage rates
Once a trip is in the list you classify it, check its route, correct it, attach a vehicle and an odometer reading, or add trips by hand. This page also covers auto-classification rules and saved places, and says where mileage rates live.
Read the trip list
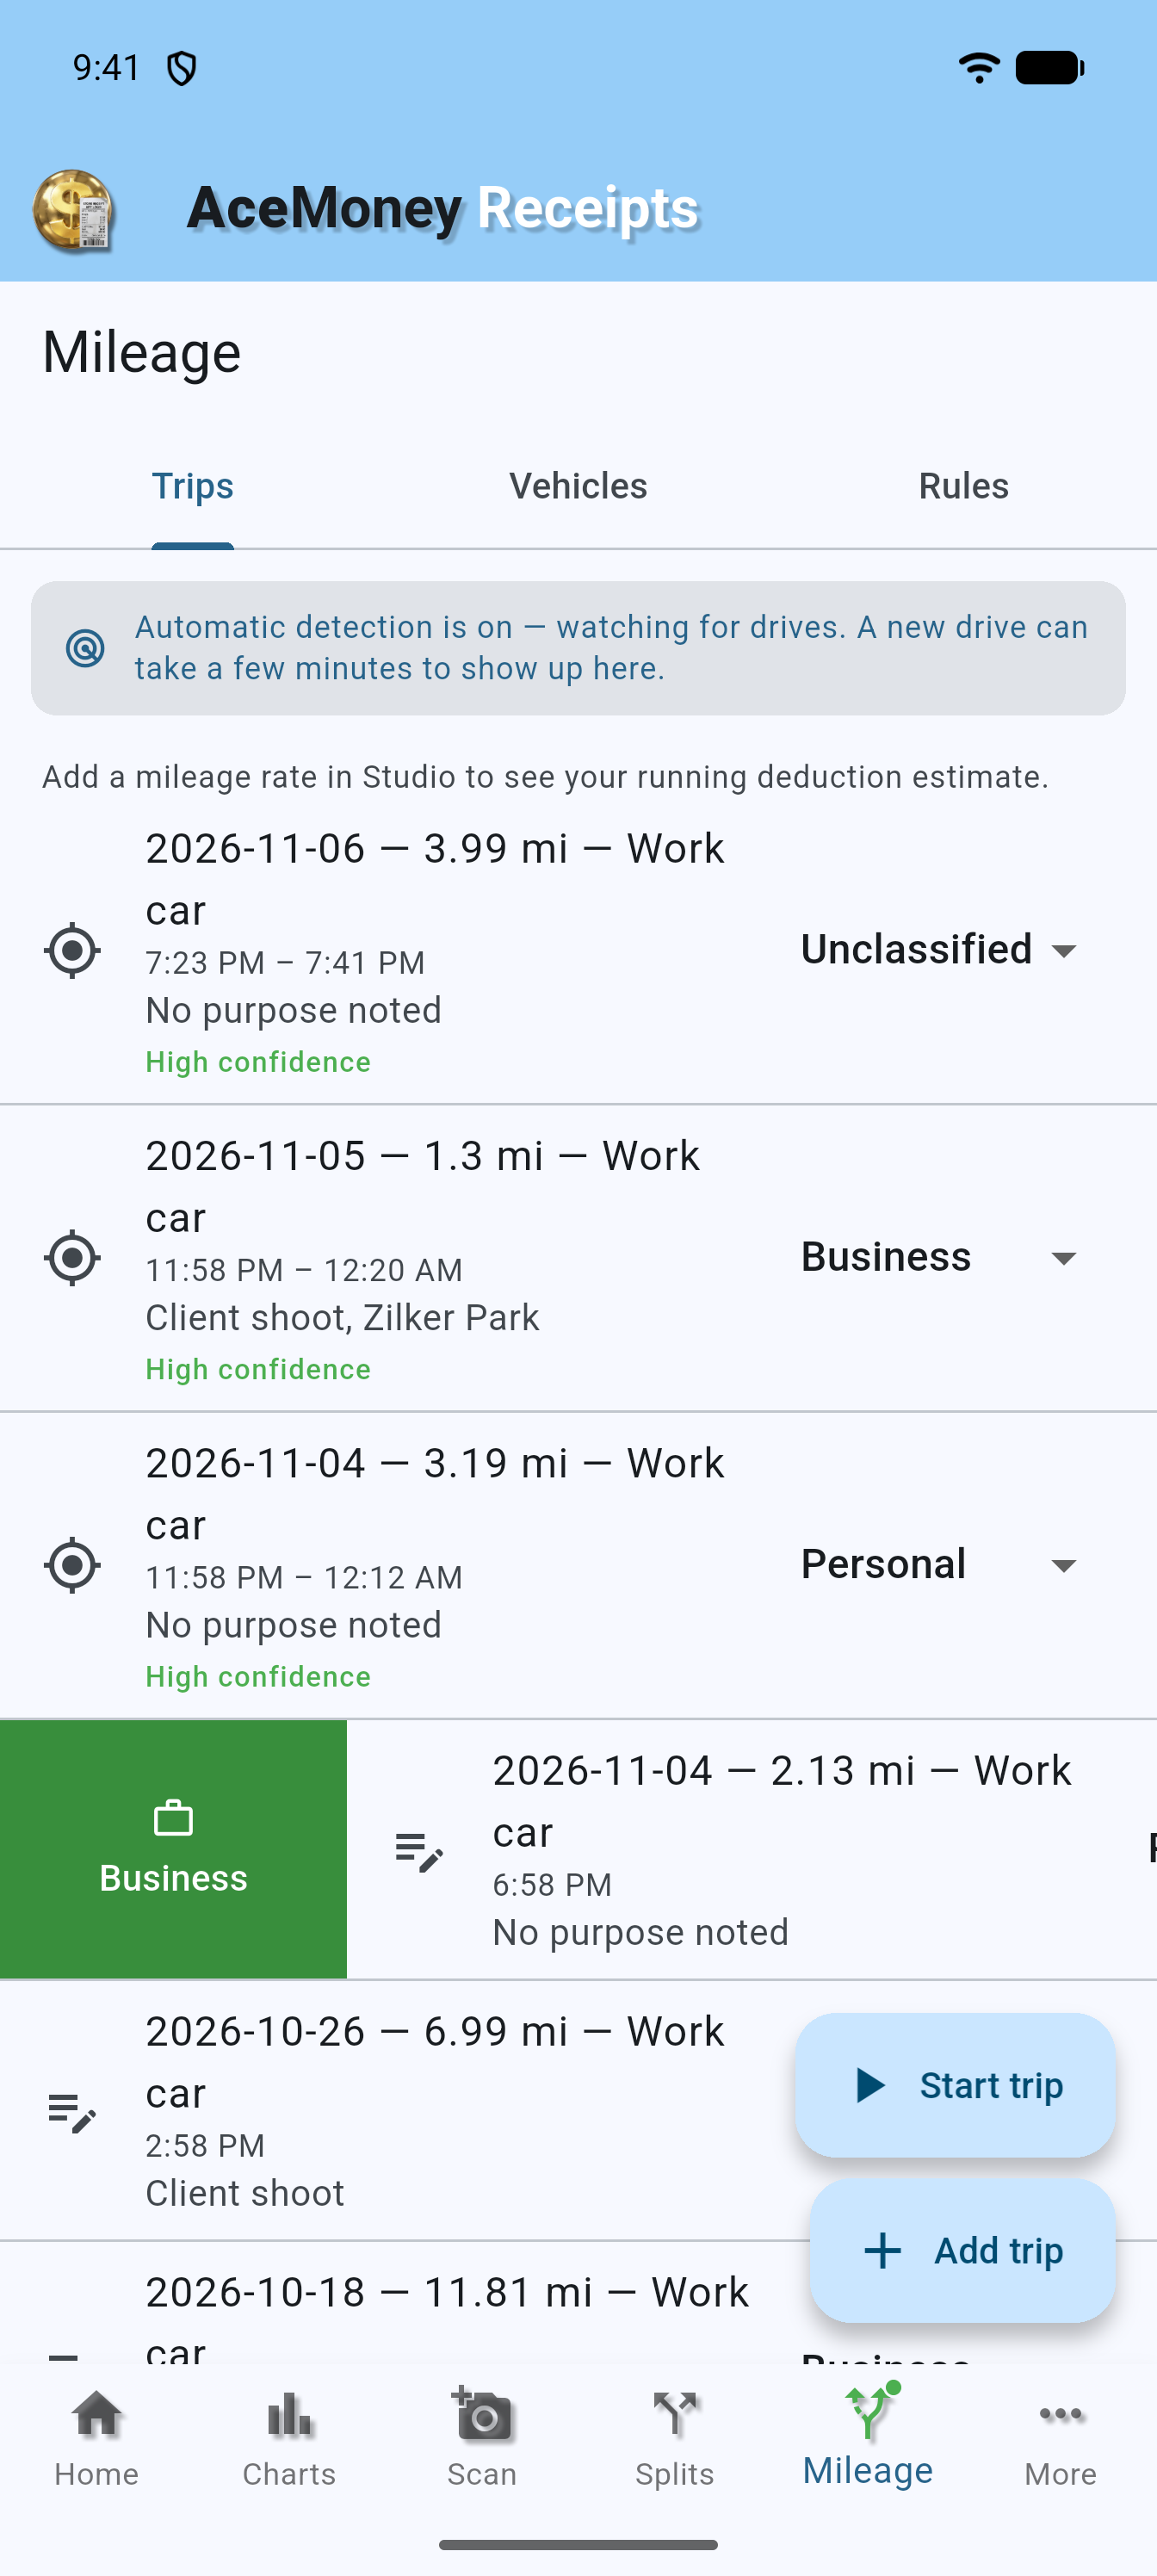
Open the Mileage tab. The Trips tab lists trips newest first. Each row shows:
- an icon on the left whose tooltip is Auto-tracked, Manual entry or Locked;
- the title, for example “2026-09-17 — 12.4 mi — My Car” (date, distance, vehicle);
- the time span and the purpose, or No purpose noted;
- for detected drives a badge High confidence, Medium confidence or Low confidence; for a trip over the free monthly allowance Locked — unlock to classify;
- on the right, the classification: Unclassified, Business or Personal.
Pull down to refresh. An empty list shows No trips yet and the hint “Add a trip manually, or track it from your phone.”
Classify a trip as business or personal
Every trip starts as Unclassified. To classify it:
- Swipe the row right to reveal Business (green), or left to reveal Personal (blue) and Delete (red), then tap the button you want. The row stays in place with its new label.
- Or tap the classification on the right of the row and pick Business or Personal.
Classify soon after the drive, while you remember the purpose. A trip marked Locked — unlock to classify waits for the Mileage plan or the next calendar month: its classification is greyed out, and swiping it opens the Get Mileage sheet. See Track your drives automatically.
Open a trip’s details
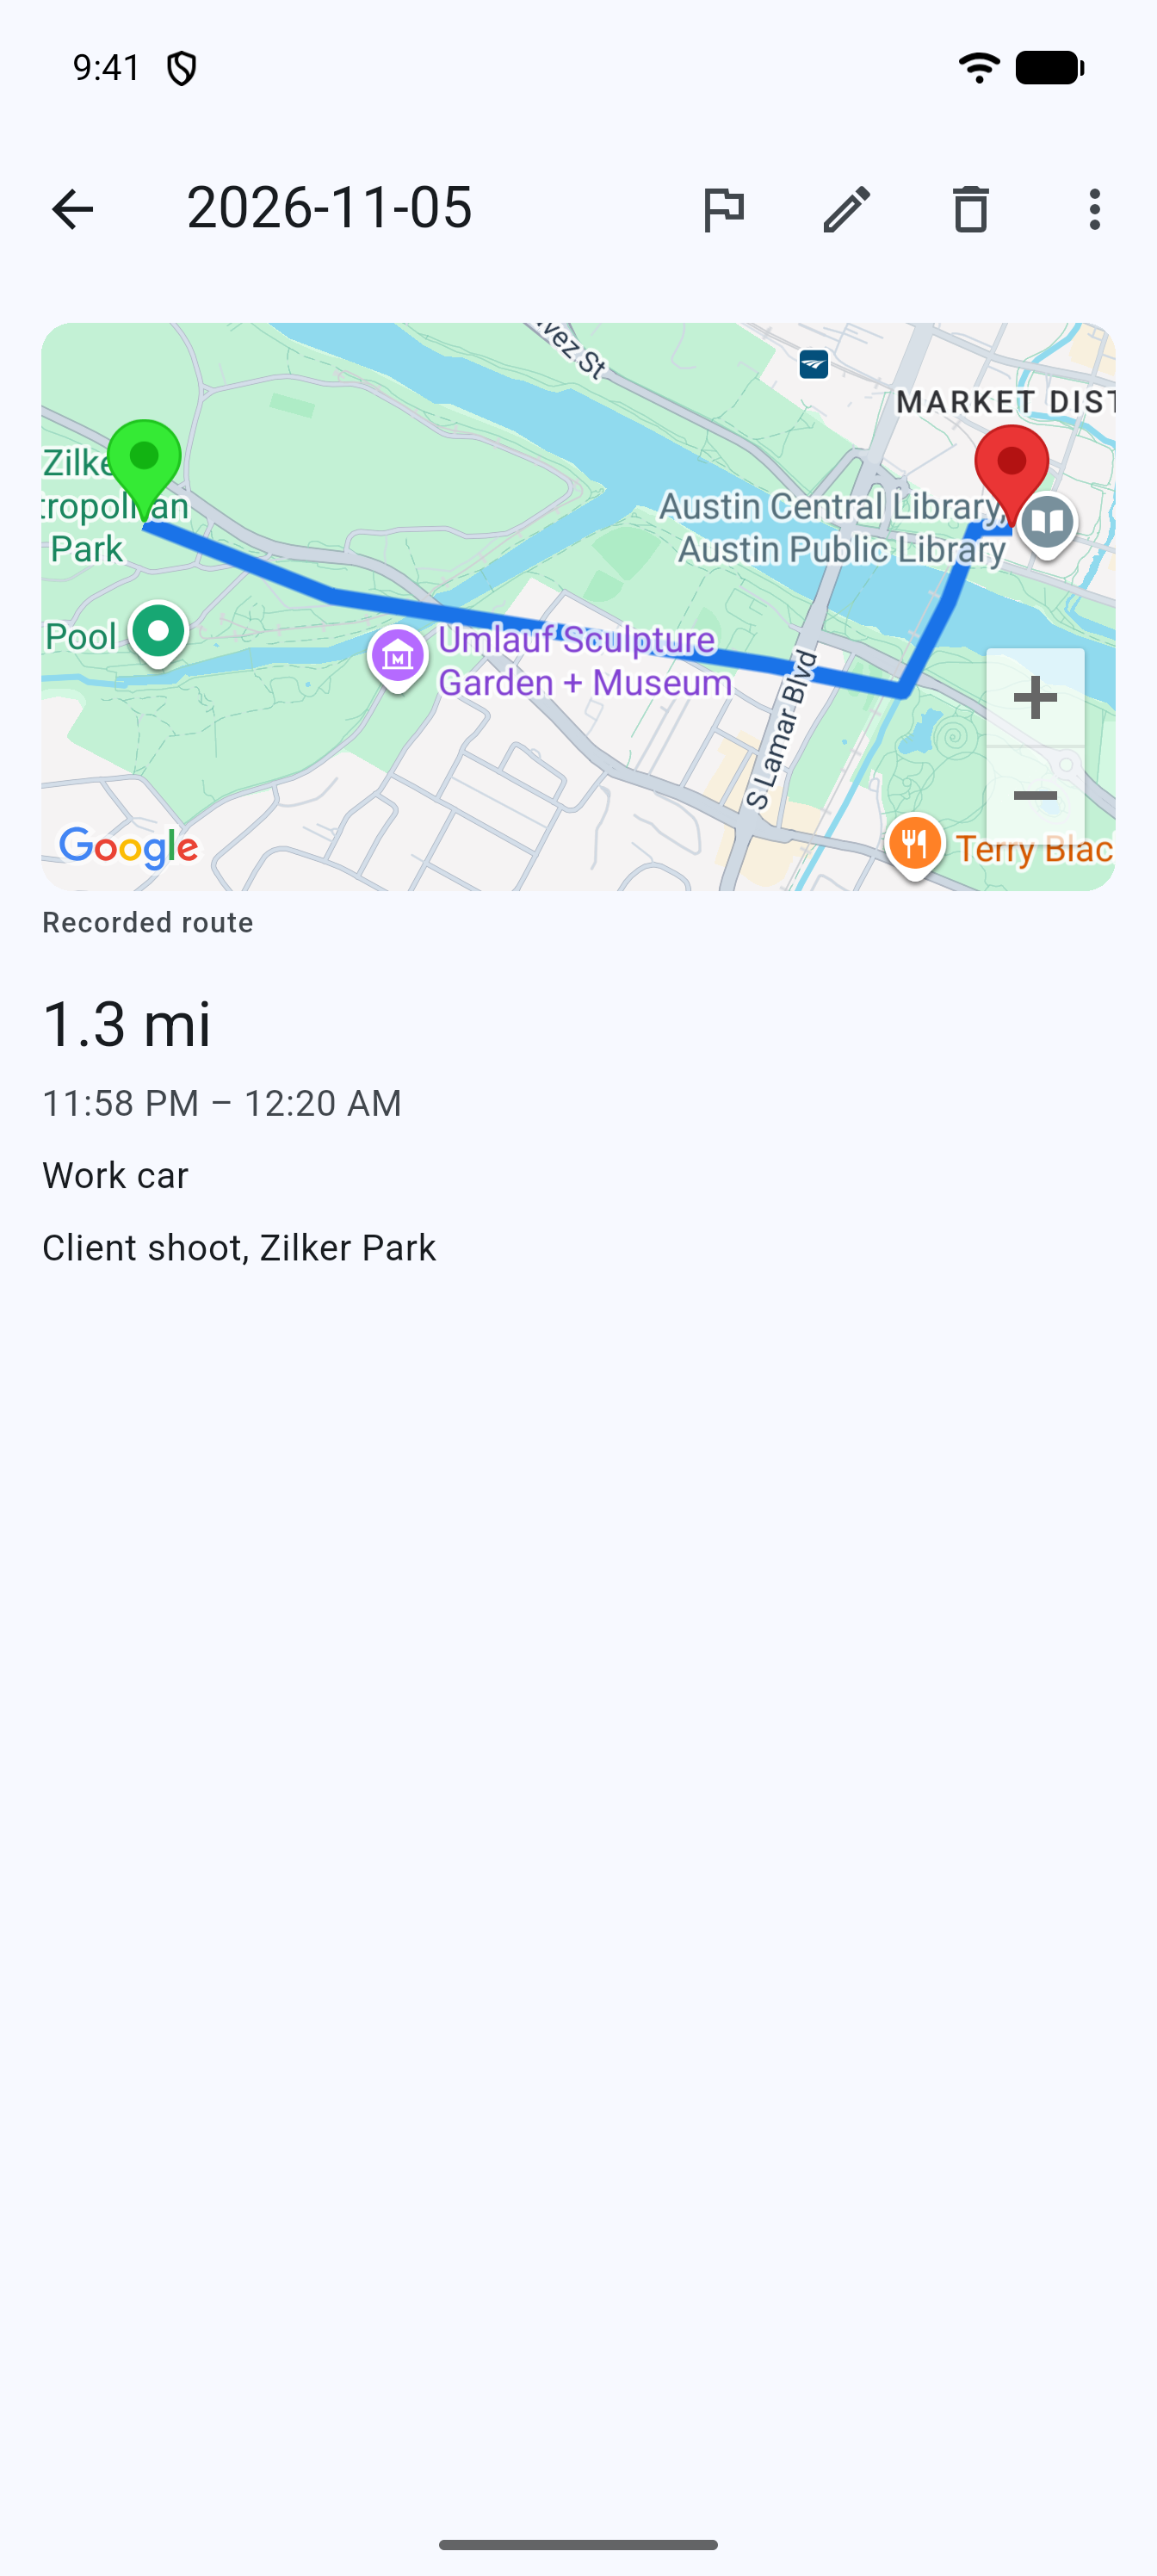
Tap a row. The detail page is titled with the trip’s date and shows:
- a map of the drive with a green start pin, a red end pin and a blue line, captioned Recorded route, or No route recorded for this trip for manual trips and for drives whose route could not be kept;
- the distance, the time span, the vehicle, the purpose or No purpose noted, the odometer readings and your note.
The pencil (Edit trip) opens the edit sheet. The trash icon (Delete trip) asks Delete trip? (“This can’t be undone.”) with Cancel and Delete. Deleting from the swipe buttons on the list does not ask first: the row goes, “Trip deleted” appears with Undo, and the trip comes back if you tap Undo in time.
Merge or split a trip
For a drive the app recorded itself that is not locked and not yet posted as an expense, the More menu (the three dots) on the detail page offers two fixes:
- Merge with another trip… joins this trip to the one before or after it. Pick which under Merge with which trip? (“The trip before” or “The trip after”), then confirm Merge these two trips?: “They become one trip of X. You can split it again at the stop between them.” If nothing qualifies you see “No trip next to this one can be merged with it.”
- Split at a stop… cuts a trip in two at one of its recorded stops. Pick the stop under Split at which stop? (for example “Stop of 12 min at 14:05”), then confirm Split this trip?: “It becomes two trips: A and B. You can merge them again.” A trip with no recorded stop shows “This trip has no recorded stop to split at.”
Edit a trip
- Open the trip and tap Edit trip.
- For a detected drive, the date, time and distance sit read-only in a Detected drive box; if they are wrong because two drives were joined, or one was cut in two, use Merge with another trip… or Split at a stop… (above); for any other error, delete the trip and add a manual one with the right values.
- For a manual trip, change Date, Time (optional) and Distance (miles) (or kilometers, depending on your units).
- Pick a Vehicle (optional): No vehicle or one of your vehicles; your default vehicle is pre-selected.
- Choose Unclassified, Business or Personal.
- Fill in Purpose (optional) with the business reason, for example “Client visit”.
- Enter Odometer start (mi) and Odometer end (mi), or scan one with the camera (next section). “Optional — enter one and the other fills in from the trip distance.”
- Add a Note (optional) and tap Save.
Read the odometer with the camera
Next to each odometer field is a camera button (Scan odometer).
- Tap the camera button. The first time, allow camera access (the same iPhone camera prompt as for receipts; Android’s own prompt).
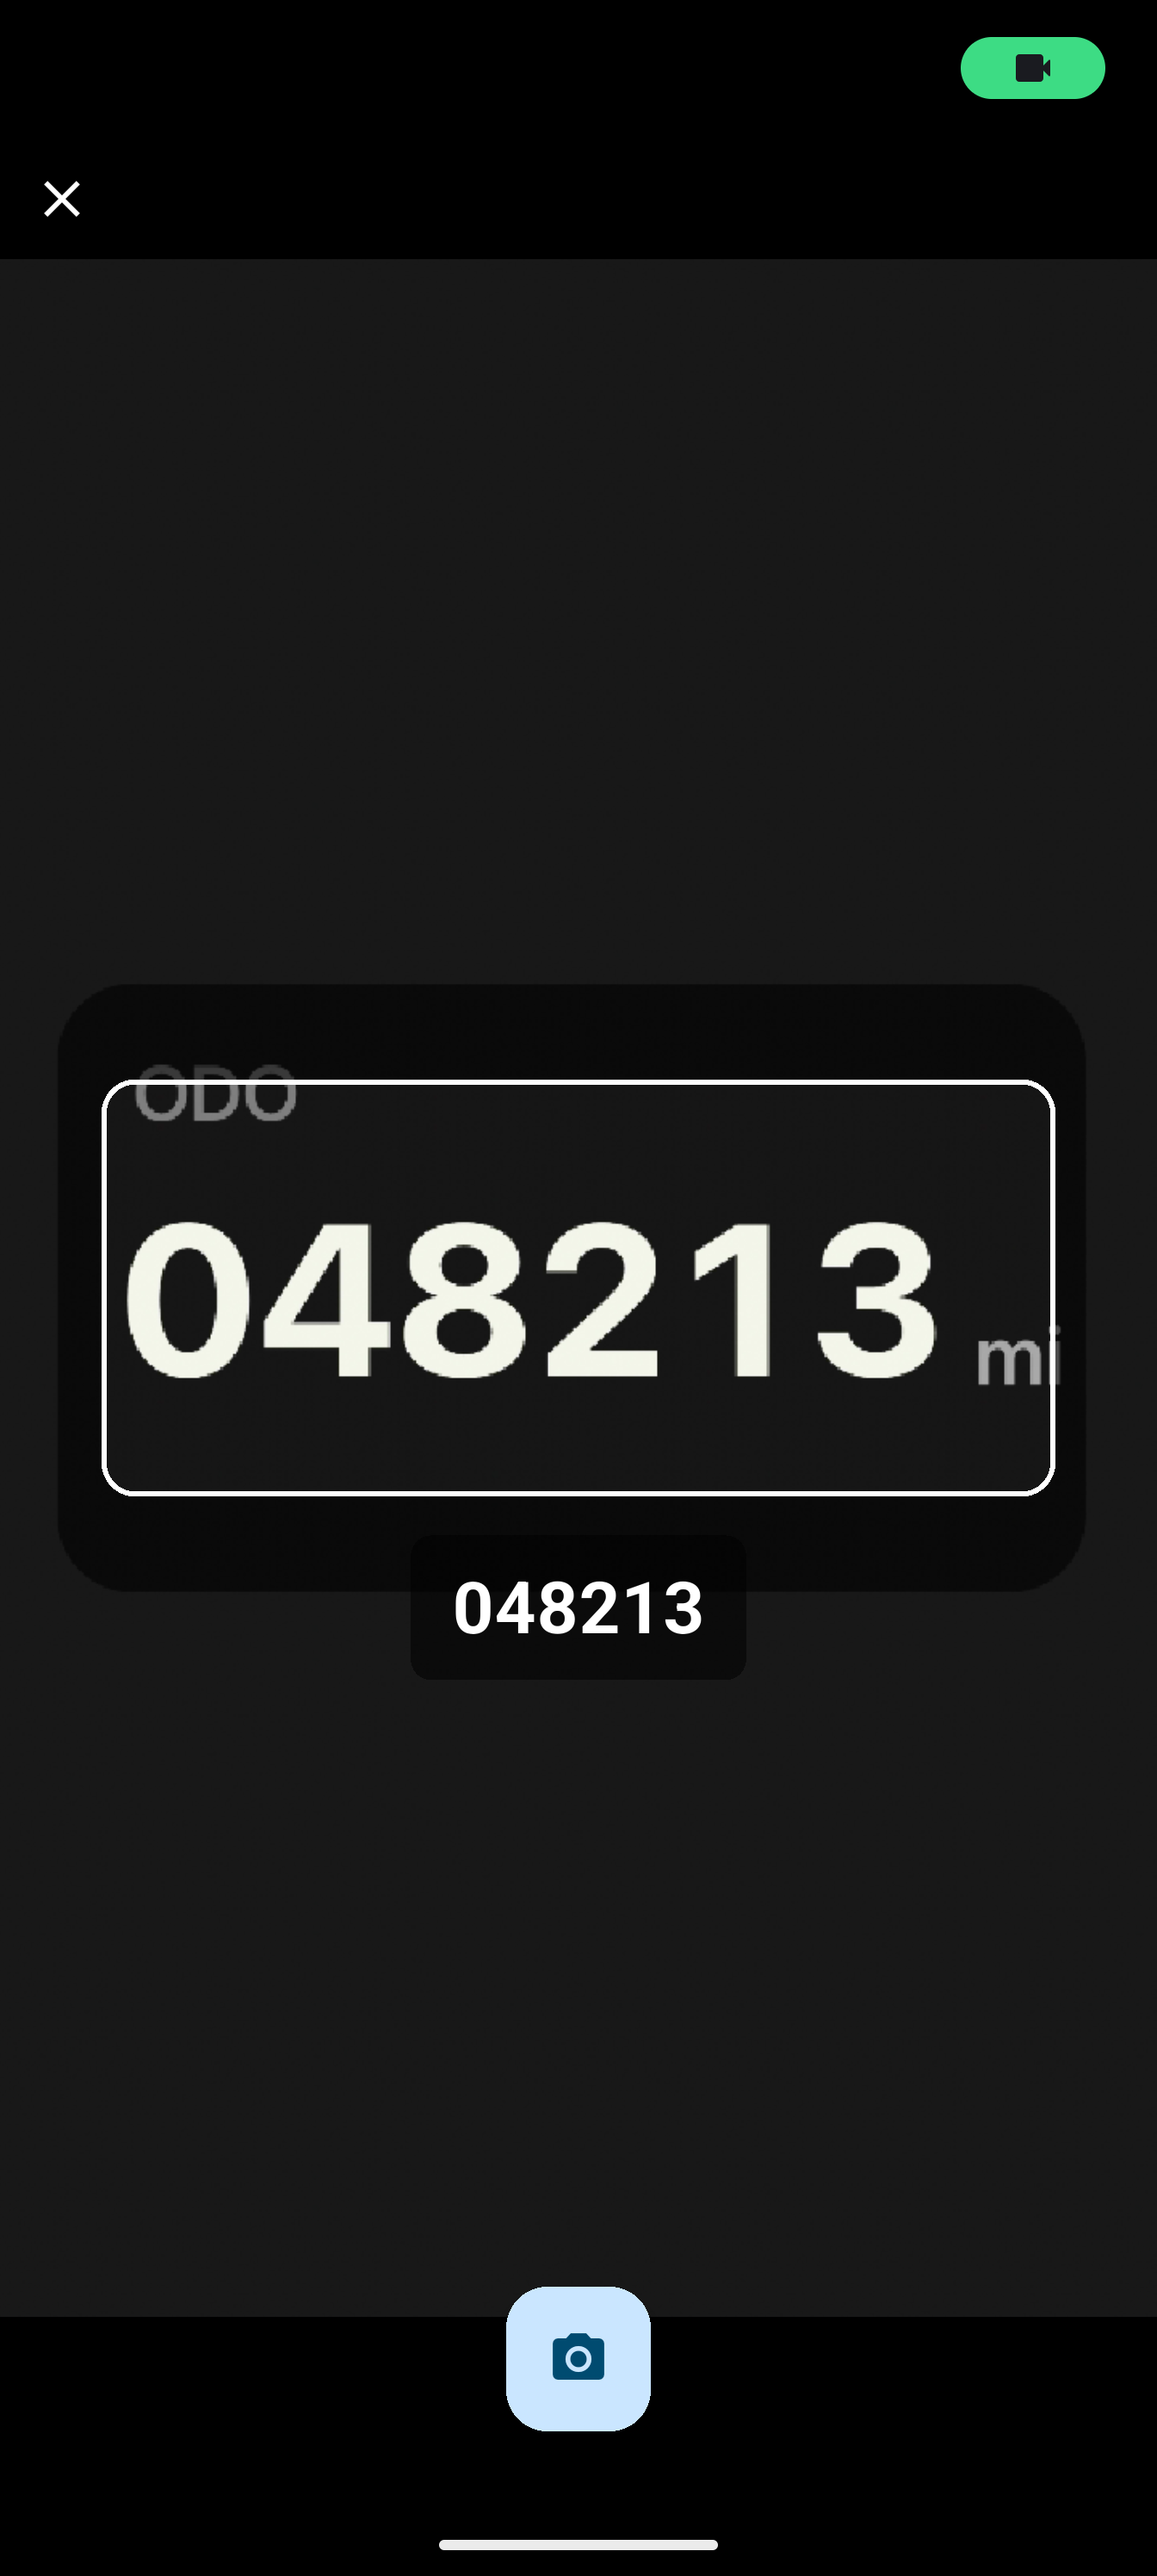
- Frame the dashboard inside the rectangle. The screen reads Point at the odometer until digits are recognized, then shows the number in large type.
- Hold still. The reading is captured automatically once it is stable; or tap the shutter button (Capture now). Tap ✕ (Cancel) to leave without a reading.
- The number lands in the odometer field. Check it against the dashboard; the app keeps the number, not a photo.
Add a trip by hand
- On the Trips tab, tap Add trip.
- Set Date, optionally Time (optional), and type the Distance (miles).
- Pick the vehicle, the classification, the purpose and odometer readings as above.
- Tap Add.
Manual trips are free and unlimited, never count against the monthly allowance, and have no route map.
Manage your vehicles
Open the Vehicles tab on the Mileage page (the tabs are Trips, Vehicles and Rules).
- Add a vehicle: tap Add vehicle, fill in Vehicle name (required), License plate (optional) and Starting odometer (optional), then tap Add.
- Edit a vehicle: tap its row to open Edit vehicle, change the fields and tap Save.
- Default vehicle: tap the star (Set as default vehicle) so new trips are attributed to it. With only one vehicle, that vehicle is the default automatically.
- Delete a vehicle: tap the trash icon (Delete vehicle). The dialog Delete vehicle? says the vehicle “will no longer be assignable to new trips. Existing trips keep their record.” Old trips then show the name with “(deleted)” after it.
An empty tab shows No vehicles yet and the hint “Add a vehicle to attribute trips to it.”
Change between miles and kilometers
Tap More, Settings, the Mileage tab, and under Units choose Miles or Kilometers. “Your saved trips are unchanged — only the display converts.” The distance and odometer fields follow the unit you pick.
Mileage rates by year and country
AceMoney Receipts has no rate screen; the line under the trip counter reads “Add a mileage rate in Studio to see your running deduction estimate.” Rates are managed in AceMoney Studio on the Mileage page’s Rates tab: tap Add rate and enter Jurisdiction (e.g. US, UK, CA), Year, Category (for example business), Rate per unit, the Unit (per mile or per km) and Effective from. Studio ships no rates; you type the standard rate your tax authority publishes for the year, and a new year gets a new rate with a later effective date while older trips keep theirs.
In the current release a rate entered in Studio is not carried to the phone, so the estimate line in Receipts keeps showing the hint. Rates are not sent with your trips either: Studio applies its own rates to the trips it receives. Use Studio’s Reports tab for deduction totals; see Get mileage totals and a tax report and Mileage in AceMoney Studio.
Auto-classification rules
The Rules tab (the third tab on the Mileage page) classifies future trips as business or personal for you. Rules live on your phone only and are not shared with AceMoney Studio. A rule is applied to a trip the app records once it has settled and is still unclassified; trips you already classified are left alone.
An empty tab shows No rules yet and “Add a rule (e.g. “Home to office”) to auto-classify future trips as business or personal.” Tap Add rule, then fill in:
- Label: your name for the rule.
- Matches: Near a place, A specific route, Commute (excluded) or At certain times.
- Classify as: Business or Personal.
- The place or places: Point A and Point B for a route, or Point (either trip end) for a place. For each, pick a saved place or choose Type coordinates.
- Match radius (meters): how close counts as a match.
- Only at certain times: turn it on to choose the Days (“none chosen means every day”) and a From and To time. “Uses the time on this device. A window that ends before it starts runs overnight.”
- Active: turn a rule off without deleting it.
Tap a rule to open Edit rule. Deleting one asks Delete rule?: ““X” will no longer auto-classify trips. Already-classified trips are unaffected.”
Saved places
At the top of the Rules tab, Saved places lists the places a rule can point at: “Save Home, Work or any place a rule can point at.” Tap Add a place and fill in Name, Kind (Home, Work or Other place) and the location, either with Use my current location or by typing Latitude and Longitude, plus a Match radius (meters). Deleting a place asks Delete this place?: “Rules that use “X” stop matching until it is saved again.” Your Home and Work places are also what Use Home and Work to start trips sooner uses; see Track your drives automatically.
Skip short trips and start trips from your car
Two settings that shape which trips are recorded live on the Mileage settings tab: Ignore short trips, which leaves out trips below a distance you choose, and, on Android 13 or later, Start trips when my car connects, where each linked car can have its own default vehicle. Both are explained in Track your drives automatically.
Common questions
Can I change the distance or times of a detected drive?
No. They are recorded from the drive itself and shown read-only in the Detected drive box. If they are wrong, delete the trip and add a manual trip with the correct values.
Why does a trip say “Low confidence”?
The badge is how sure the app is that the movement was a real drive; low confidence usually means a short trip, weak location signal or stop-and-go movement. Check the route on the detail page and delete the trip if it was not a drive.
Why is there no map for my trip?
Manual trips have no route. A detected drive shows No route recorded for this trip when the phone could not keep enough location points, for example in Battery saver mode or with poor signal. The distance is still recorded.
Do I need a vehicle or odometer readings?
No. Trips can have No vehicle, and odometer readings are optional evidence. Vehicles help when you drive more than one car, and a vehicle’s Starting odometer plus a year-end reading on a trip give the per-vehicle readings tax authorities often ask for.
Can I mark my commute automatically?
Yes. On the Rules tab add a rule that Matches Commute (excluded) along your usual route and Classify as Personal. Or swipe the trip left and tap Personal.
Can I attach a fuel receipt to a trip?
No. Scan fuel and parking receipts as ordinary receipts; they are separate from the mileage log.
Troubleshooting
- The distance field shows an error and the trip will not save. Distance must be a positive number; use a decimal point, not a comma.
- “Hold steady on the odometer — no number read yet.” Move closer, avoid glare on the dashboard glass and keep the digits inside the rectangle until they are read.
- “Camera permission is needed to scan the odometer.” Tap Open settings and allow the camera for AceMoney Receipts.
- “No camera is available on this device.” or “Could not start the camera.” Another app may be using the camera; close it and try again, or type the reading.
- The camera read the wrong digits. Correct the number in the field before saving.
- The classification on a row is greyed out, or swiping it opens the Get Mileage sheet. The trip is locked (over the free monthly allowance). See Track your drives automatically.
- I tapped the wrong button after swiping. Tap the classification on the row and pick the right one. If it was Delete, tap Undo in the “Trip deleted” message straight away.
- My rule did not classify a trip. Rules apply only to settled trips the app recorded that are still unclassified, and only while the rule is Active. Check the rule’s place, radius and, if set, days and times on the Rules tab.
- A vehicle is missing from the Vehicle list. It was deleted; old trips keep it as “My Car (deleted)”. Add it again if you still drive it.
- “Could not load trips” or “Could not load vehicles”. Close and reopen the app. If it persists, contact support.